In this article
Help us make these docs great!
All rapyuta.io docs are open source. See something that's wrong or unclear? Submit a pull request.
Make a contributionEnabling VPN Services
VPN Overview
rapyuta.io supports the native VPN. It now provides the capability to connect devices and device deployments in a warehouse with deployments running in the cloud and vice-versa. It will also allow device (robot/edge) addressability in the warehouse for debugging and maintenance.
You can use the CLI to enable VPN on projects, devices, and cloud deployments.
Enabling/Disabling VPN on projects
To enable/disable VPN while creating a new project:
- To enable VPN while creating a new project, in the create a new project modal, click the Enabled button. For more information, see Managing Projects
To enable/disable VPN for an existing project: To enable or disable VPN for an existing project, follow these steps:
-
On the left navigation bar, click Account > Project. The panel displays a list of projects.
-
To enable/disable VPN for a project, under Actions select the Edit icon and click the Enabled/Disabled button.
- Only an org admin or a project creator can enable/disable VPN on projects.
- When you create your first project, you cannot view the VPN option. However, you can enable it after creating the project (refer to step 2).
- The VPN status is displayed alongside the project list, and it can have various statuses, including:
- VPN Enabled - This message indicates that VPN is successfully enabled for the project.
- VPN Disabled - This message indicates that VPN is currently disabled for the project.
- VPN Error - This message indicates that there was an error during the VPN connection process, resulting in a failed connection. For more information, see VPN Services Troubleshooting
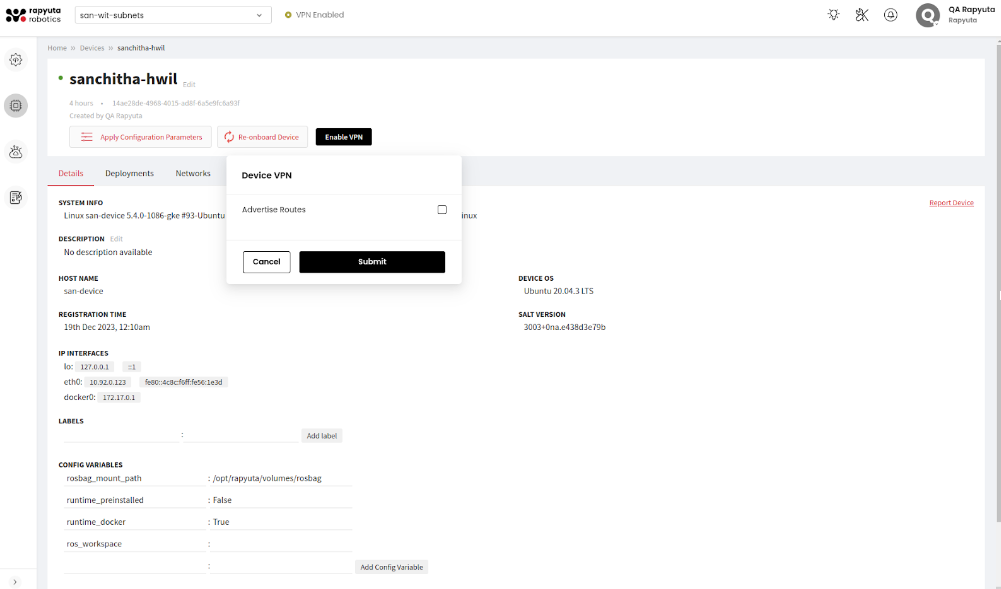
Enabling VPN on Devices
To enable VPN on devices:
- Navigate to the right navigation pane and click Devices.
- Select the specific device for which you want to enable VPN.
- On the device details page, if VPN is disabled, click Enable VPN. If subnets are specified during project creation, a pop-up appears with the Advertise Routes field. To advertise your device on the subnets specified during project creation, mark the checkbox. For more information, see Enable VPN for an Online Device.
VPN can be enabled on devices only if VPN is enabled for the selected project and if the device is online.
Enabling VPN on Cloud Deployments
VPN can be enabled on cloud deployments while depolying the package. To enable VPN on cloud deployments:
- Select the package, and click Deploy Package.
- In the deploy package modal, beside VPN Client click Enabled . For more information, see Deploying Packages
VPN can be enabled for cloud deplyments only if VPN is enabled for the selected project.
Enabling VPN on projects
You can either create a new project and enable VPN in the project manifest or enable VPN in an existing project.
To list projects with features:
rio project list -w
To create a new project you will have to first create a project manifest, set the attribute vpn.enabled to true and then apply the manifest.
For example, create a project manifest project.yaml as below:
apiVersion: api.rapyuta.io/v2
kind: Project
metadata:
 name: dev-tst-001
 organizationGUID: org-wvnwcmvfkbajavjetttcutga
spec:
 features:
   vpn:
     enabled: True
     subnets:
       - 10.81.0.0/16
 users:
   - emailID: admin@rapyuta-robotics.com
     role: admin
The subnets attribute is optional; if you wish for any devices within the warehouse to broadcast a particular subnet, configure this at the project level.
To apply the maifest:
rio apply project.yaml
To update an existing project
Before proceeding with any project updates, ensure that you fetch the current manifest to prevent unintentional overwrites of any essential configurations. Review the changes and then apply the updates accordingly.
To fetch the project:
rio project inspect dev-tst-001 > project.yaml
To update the manifest:
apiVersion: api.rapyuta.io/v2
kind: Project
metadata:
 name: dev-tst-002
 organizationGUID: org-wvnwcmvfkbajavjetttcutga
spec:
 features:
   vpn:
     enabled: True
     subnets:
       - 10.81.0.0/18
 users:
   - emailID: admin@rapyuta-robotics.com
     role: admin
Enabling VPN client on devices
To view the list of devices:
rio device list
To enable VPN on all online devices:
rio device vpn true
To enable VPN on selected devices:
rio device vpn true --devices=<device_name> --devices=<device2_name>
For example, if you want to enable VPN for the devices amr01 and edge02,
rio device vpn true --devices=amr01 --devices=edge01
To enable VPN with the - -advertise-routes flag:
rio device vpn true --devices=edge01 --advertise-routes -f
Restoring VPN Connectivity with Updated Subnet Ranges: Re-enabling VPN on Devices
If you have updated the subnet ranges, re-enable the VPN with the advertise-routes parameter set to true on devices where VPN was already enabled.
rio device vpn true --devices=<device_name> --advertise-routes -t
Disabling VPN client on devices
To disable active VPN on devices:
rio device vpn false --devices=edge01 -f
Run VPN client in cloud deployments
To Run VPN client in cloud deployments you will have to first create a deployment maifest, set the attribute vpn.enabled to true and then apply the manifest.
For example, craete a deployment manifest, deployment.yaml.
apiVersion: "apiextensions.rapyuta.io/v1"
kind: Deployment
metadata:
  name: "nginx-with-tailscale"
  depends:
    kind: package
    nameOrGUID: "nginx"
    version: "1.0.0"
spec:
  runtime: cloud
  features:
    vpn:
      enabled: true
To apply the maifest:
rio apply deployment.yaml
Connecting your machine to a project’s VPN
- Select the project that you want to connect to
rio project select <project_name>
- Connect to the VPN
rio vpn connect
- Check status
rio vpn status
- Check the status of the tailscale client
tailscale status
- To disconnect, run
rio vpn disconnect